
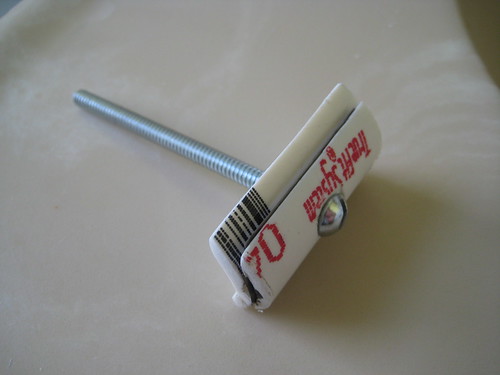
It’s terrifying. I’m still in shock that it actually works, but it totally does. One dollar of materials and two or three hours of work, and I now have a safety razor of my very own.
Why? Why would you do something like this?
Basically, I’m cheap and I like making things for myself. I’d been toying with the idea off-and-on since reading a Lifehacker post on safety razors. It all came together for me this past week.
Eureka!

I was looking at an image from an old razor patent when inspiration struck. Based on the known razor width and some trigonometry, I was able to determine that the two main radii were 0.53″ and 0.66″. It turns out that these are almost identical to 3/4″ and 1″ sch40 pvc, which is available everywhere.
Construction
Sorry. No mid-build pictures on this project. I never thought it would work. This was supposed to be a study of sorts, just seeing how things might work in further iterations. Instead it worked, and I’m stuck trying to give the gist of it…
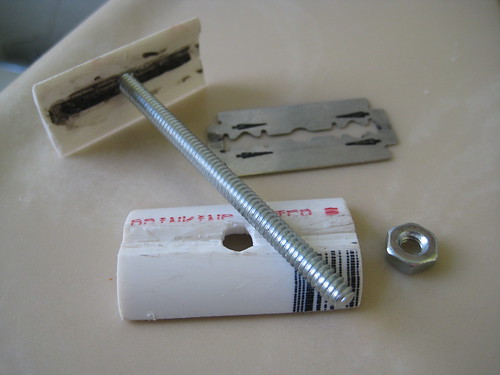
- Cut a piece of 3/4″ pvc slightly bigger than the desired top piece.
- Wrap sandpaper around some 1″ pvc and sand down the botton edge of the 3/4″.
- Cut a section of 1″ pvc for the bottom piece.
- Make holes in the top and bottom pieces.
- Run a bead of jbweld down the center of the top piece. as it hardens shape it into a ridge.
- After the jb hardens, sand such that it just fits the blade’s slot.
- Remove material from the bottom piece to make room for the jb ridge.
- In theory, you’re done! In reality there’s some fine-tuning to do. It took me about an hour of trial-and-error sanding until I was happy with the final shape of the top piece.
I’m going to shave with this for awhile, and when I make the next one I’ll try to be more diligent about documentation.
This is brilliant. Do you mind if I use your pictures to write about this on http://www.bruceonshaving.com/ ?
yeah no problem
Pingback: DIY double edged safety razor — BruceOnShaving.com
Dude, can you make more… i would be willing to buy one from you for the novelty of it, if for no other reason!!!
I’m playing around with a (somewhat) easy technique for assuring that the blade is leveled and aligned. If it pans out I’ll do an instructable and you can make your own.
how much does it weigh? Like for ultralight backpacking. Could you thread a titanium tent peg?
This is a neat project. I’m not familiar with jbweld, is that a brand name? What other product would you recommend that is universally available.
JBWeld is a 2 part epoxy. some would say it’s THE 2 part epoxy. it’s perfect for this application in that when first mixed it has the consistency of peanut butter. Because of this it can be easily molded into the ridge shape. JBWeld is pretty universally available in the US at least.
I thought it was just a sculpture until I read further and saw that it actually works! Brilliant, and thanks for posting.
You didn’t make just the handle, but the entire safety razor. I particularly like your baseplate and cap solutions, though the handle is ingenious as well. The next step might be to drill a hole the length of a short dowel, slide that over the length of the screw from the bottom, and use another nut to hold the dowel in place, providing a more comfortable (but easily removed) handle. Just a thought.
Hey this is great. Very cheap and all you need is to file in a comb for those that like an open comb.
Are you willing to share which radii is which? I’m assuming the top piece and the base are different?
Thanks!